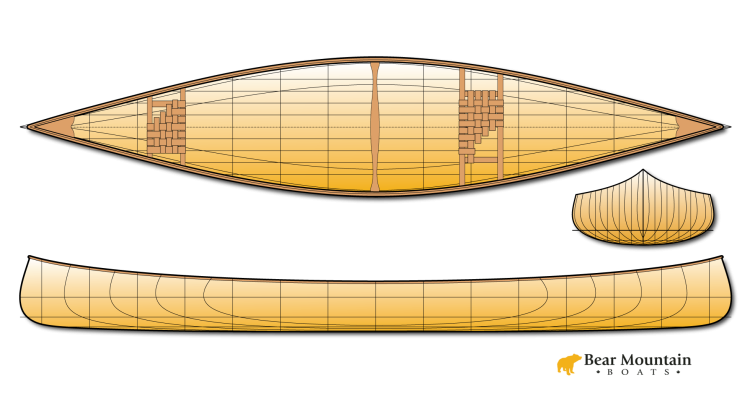
Continuing with the stripping. Using a robo-bevel to fit the strips.
Music: "Cello Suite #1 in G - Prelude" Kevin MacLeod (incompetech.com) Licensed under Creative Commons: By Attribution 3.0 License http://creativecommons.org/licenses/by/3.0/
[Music]
so yesterday I got a strip on the boat
so today we're gonna continue with that
we're gonna start adding more strips up
here try and get at least as far as the
waterline we'll see how far we get but I
thought I'd talked a little bit first
about my work setup here so what I have
here is my external strong back with a
couple supports that hold my internal
strong back I've also placed some little
work surfaces on either side of the boat
these are just handy horizontal surfaces
where I can put a strip on if I need to
bevel a strip or something and just a
place to put my tools down while I'm
working where I can see them and it's
just a convenient little space it's just
a 1 by 4 and a 1 by 3 nailed together
into a little T section that I screw
into some 2x4 cross beams and again just
a convenient little work surface I put
some wax on this surface so if I should
spill epoxy on it a spill glue on it it
tends to pop right off I can clean this
up easily but I cut into it it's not a
the precious surface it's anything just
a place to do a little bit of work
convenient to the boat instead of having
another work bench somewhere across the
room I got this right here for whenever
I need it
so if the tools all sharpened up we're
ready to start adding some strips so
I've got strip eight here a little
drawing from the portside I'm going to
be looking for one that's circled and
forget if it's going up or down but go
over your stack and see what we've got
so here's our material for the hall
first strip on the top is seven here's
the seven with a circle around it and
this is on the same side of the boat
where I'm looking to put the strip so
I've got the stacks arranged to
correspond to which side of the boat
what's going on pull out strip seven
it's no place to strip in place here and
then I one of these little u-shaped
clamps just to tame it so it doesn't
keep falling off and we take a look at
the alignment these lines here will line
up when the grain is perfectly lined up
we want to do a dry fit make sure
nothing's in the way of getting a good
tight fit and here we've got a little
bit of a gap they could strip off and we
see we've got a little bit of glue
squeeze-out there from the hot melt glue
so you want to come in cut that out and
inspect all the forms make sure it's
okay everywhere else when you've cleaned
out all the glue we come put the strip
back in place and put one of the little
jigs on there and now we look at the fit
so if we hold this down against the form
see a little bit of a gap there right
there we'd like to close that up this
will look like one piece of wood that'll
look like the line between two pieces of
wood we want to get that one piece of
wood look what's happening here is the
form curves away and so when you lay
this strip down on here we've got a
square bottom on here and a square top
on there and so there's a you know a
couple degree difference between these
two strips and how they meet so
we could either bevel the bottom edge of
this a little bit to make it fit the
existing strip or we can double the top
of the existing strip to make it fit the
new strip forming that bevel is where my
Robo bevel comes in the tool lays up
flat against the forms it has a little
miniature shoulder playing here and so
as I run the tool along the top of the
forms holding it tight to the forms it's
going to cut off the top edge of the
existing strip to be square to the form
above it and so I just run this tool
down along the strip engaging the blade
keeping it tight against the forms so I
end up curling off a little bit of wood
with each pass I run the tool along the
top edge of the strip and the peals of
little curl off the inner edge
if you keep on planing until it goes all
the way across the surface you know
you've got the tight bevel
set the tool to a light touch so the
very light cut should only take a couple
passes you do get chips jammed in the
gullet there but poke it out with a
pencil you see you're cutting the full
width of the top edge of the strip
you're done places have more curvature
in the forms we're going to require more
work than where it's straighter when you
think you've got it beveled place a new
strip back in place loosely clamp it
down and inspect your results so test
fit very tight with the top edge of the
existing strip beveled so we have a good
tight fit with the new strip we can take
the new strip off and apply some glue to
the top edge of the existing strip
before we get it permanently glued down
make sure the reference lines are lined
up one to the next that will make sure
that grain gets the line correctly tape
makes a great clamp
you want to keep these strips tight to
each other as well as tight to the form
so I'm pulling hard on this tape as I
stick it down so there's tension in the
tape as I'm clamping it together and we
want to glue the strips to the forms get
them tight up against the forms once you
get everything glued down we want to
double check and we want to make sure
that there's a tight seam in between the
strips and the surface is smooth no step
at the stems we have this little bit of
overhang on this side we want to cut
that off pretty soon otherwise walking
around it you might end up just snagging
on your shirt or something and ripping
it off it's no fun doesn't need to be
perfectly flush with the inner stem
actually sticking out a little bits not
a bad thing
but we want to make sure it doesn't
interfere with the new strip coming in
on the other side with that strip
installed we can go onto the other side
and so the second strip on this second
side is strip number seven again this is
starboard so looks like we're good it's
going to be little drips of glue so
before I even dry fitting it just go
through and clean those off
and we know there's going to be a bit of
a bevel needed so let's just start right
off with that it looks good give it a
drive this is where the most curvature
is so it's not surprising that's where
the most beveling is required getting
all the way across the top edge for a
good tight tip very nice perfect so now
we glue it doesn't take a lot of glue
here just a little bead enough to get a
little bit of squeeze out but we don't
need it dripping all over everything
really small have big bottle with a big
huge opening you end up with I always
put the top back on the glue bottle
because the bottle gets the tip will get
gummed up and then you'll start shoving
nails through it and making a bigger
hole and you end up with a goopy mess
line the strip these are reference lines
there and I like to use these brackets
all the way down the full length
come by with a masking tape sure all the
strips tightly together take down tight
you'll see this glue squeeze out a
little bit I'm gonna break for lunch
right now I haven't put any hot melt
glue to secure the strips to the forms
but I've got these brackets at every
form and while the yellow glue is drying
those brackets are good clamping
pressure better clamping pressure than I
can get with the hot melt glue if I come
back and find I need to secure the
strip's back to the forms after the fact
I can always come through with some hot
melt glue and tack them down now that
I'm done with lunch I can come back and
start adding more strips start by
removing the glue and glue is dry
between the strip's so I'll take the
tape off now we'll grab the next strip
which should be number six we're
obviously going to need to bevel this
this area the curves starting to get
tighter as it nears the bottom and so
it's taking the more beveling to get
that square it up so this has a little
bit of twist here making a little bit
hard for it to fit in there
so this wants to lay here and here you
see it takes a little bit of twist to
get it to lay flat up in here so we
could probably do this without any
assistance we'll lay in a little bit
easier if I give that a little bit of a
pre twist so use the heat gun just come
in there and give this a little torquing
before I lay it in that way I won't have
to do anything to get it to lay in once
it's once the glues on there so the area
where the twist happens it's right from
here to here from here up through here
so I want to take that area heat it up
and pre twist it I'm twisting this edge
down so it's this section right in here
I'm going to be twisting it this way so
this edge down we're gonna heat up that
whole area and putting a little bit of
twist on it already and as it gets warm
I'll eventually feel it just sort of
give way a little bit the tension will
relax ever so slightly I'm feeling it a
little bit now it's a slight relaxation
just hold it for a little while while it
cools off and you see there's a subtle
twist to it put this back up in place
and it aligned correctly and it helps
doesn't do everything still a little bit
of tension in there you could get rid of
that we'll go ahead and do a little bit
more it is possible to really distort
the strip this way get it so it's got
funny curves to it and doesn't lay fair
what you want to do sort of gradual
stuff if I heat it up just one spot all
the twists would happen at that spot and
that wouldn't be the fair nice smooth
twist we're looking for so that's a
little bit more pronounced it's flat
here you get a bit of an angle there
that should be just right to get right
in there sorry like that see it's laying
flat right up here
slide on the form right there and good
right there so basically don't need to
put any pressure on the strip to get it
to lay flat you don't need to do this
every time but this is a place where the
twist happens fairly abruptly and just
this last 10 inches or so so now we
should be ready to glue up this the top
of this strip and put the next one on
again we don't want to put a lot of glue
on here just a little bead enough to
squeeze out just a little bit but not
dripping all over the place you know
you've got enough on there if you get a
little squeeze out you know you've got
too much if it drips all over the place
I prefer not to wipe off the wet glue
I'd rather have it just beat up and then
scrape it off later the really thin
smear is really hard to see so you may
think you have the glue off the surface
but if it's in a really thin smear when
you're saying that you might not end up
removing that glue and you won't really
know until you get the epoxy on there
you might not see anything at all until
you get the epoxy on there then it'll
show up as a little light spot and again
I put the cap back on when I'm done
so that fine tip stays as a
tip I don't end up jam and nails through
there to try and get the glue out now
let's do strip into place get to
register lines here lined up with a
clamp on it I'm just putting these
little jigs over it using those as my
clamp get the pressure down on the strip
so it's pressing it from strip - strip
and down so it's pressing it tightly
against the forms same at the other end
start working down the length and in the
little brackets again push it tight
against the forms and tight against the
previous strip and you know you get the
right amount of glue you'd guess a
little bit of squeeze out there and come
back with the tape wrap it over press it
down pull and we have a little bit of
misalignment here the strip we're trying
to get rid of that while we taping press
it down pull get a little squeeze out
like that getting a little bit of
squeeze out and at the end
get it tight down there get a clamp on
it and once again we cut off the excess
so it's not in the way of the strip
coming up the other side and on this
side glue should be dry pull off the
clamps and pull off the tape this tape
system seems kind of wasteful and seems
like a bit of a half sold taking the
tape on and off all the time I haven't
found anything that's as quick and
reliable for getting pressure between
the strip's we could put clamps on it
you know if we get some of those quick
clamps and just go strip - strip but as
you start getting around the corner that
no longer becomes practical where the
tape can use on any contour and shape it
can be useful to put a little stitch of
hot glue across a strip but that really
doesn't provide any clamping pressure so
it's great once you have something there
and it's tight and once the glue is
cooled off it'll hold the position but
it's not going to apply any more
pressure than what you put on there
before you put that hot melt glue on it
I get tired of pulling this tape on and
off and I go through a lot of rolls of
tape but I'm really happy with how it
works for getting good tight seams in
this kind of construction
I'm finding this blue seems to be
releasing fairly a little bit more
easily than I'm used to I'm not sure
what's going on always glue it back down
I might try a different glue see if it
holds any better
all right now
Robo pebble time most of our works going
to be right up here in the down a little
bit at the stone
so now with the top edge of this strip
all prepared we should be able to go and
grab the next strip in the stack which
should be number six let's do a dry fit
make sure everything is indeed fitting
well it's nice and tight we'll probably
want to give this a little pre twist all
right it looks good and tight applying
this glue I use my fingers a little
fence to help keep the tips centered on
the strip just light squeeze nice even
bead all the way down strip up and
that's the reference lines come back
through with the tape
never hurts to come back and inspect
everything make sure everything's tight
the way you want it so I was hoping to
get four strips on today I got three
which is pretty good given that I was
having to stop and do video stuff at the
same time so it's pretty good progress
things are really looking nice the
strips are matching up well fitting
together on there really nice and
pleased with house coming out so in the
next episode we'll keep on adding strips
I'll try and fit in some background
information on various things as we're
going along feel free to post your
questions and comments in the comments
area I really look forward to hearing
what you have to say my patreon
supporters are seeing this a few days
before the general public so if you're
impatient want to see what's going on
come over to my patreon page and give me
a little support I'd really appreciate
it it helps out a lot
if you're interested in Robo bevel it's
something I do sell it's a product I
make myself here with my CNC machine put
them together by hand the next episode
we'll be adding more strips until then
thanks for watching and happy paddling