In this episode Nick begins by providing an overview of the tasks at hand, which include installing the skeg box and control slot before attaching the deck to the kayak hull. He explains the purpose and positioning of the skeg box and control slot, emphasizing the importance of proper placement for functionality and ergonomics.
Nick then walks through the process of marking and cutting the opening for the skeg box, ensuring accurate alignment and depth. He also demonstrates drilling a hole for the barb fitting that will facilitate the cable routing. Particular attention is given to the skeg box's offset mounting to prevent sand buildup during beaching.
Next, the video covers the installation of the control slot, including aligning the stainless steel tubing guides, applying epoxy, and glassing the area for reinforcement. Nick meticulously details each step, from heating the area to promote epoxy penetration to shaping the fillet for strength.
With the skeg box and control slot in place, the Nick moves on to glassing the skeg box, carefully wrapping bias-cut cloth around the box and reinforcing the fillets. He also installs the barb fitting and checks the alignment of the control slot tubes.
Finally, Nick installs and glasses the cheek plates, which help keep the paddler centered in the kayak. He concludes by expressing gratitude to viewers for their interest in this in-depth project and looks forward to attaching the deck in the next episode.
So this is another day without Bill. I've just got a few small things to do that are sort of critical to have done before proceeding with some of the larger projects. The next big project is attaching the deck to the hull. Before that, we want to get done with all the sort of systems inside the boat, and the primary systems we have here is the skeg box and the skeg control slot.
The skeg Box goes in the hull in back, and the control slot will end up right in this area. In the instructions, I say it should be 5 to 6 in behind the front of the cockpit. We want it in such a place that when you're sitting in here paddling, you don't hit it with your hands, yet it's easy to access with your hands. And typically, I'm right-handed, so I like to be able to hold on to my paddle with my right hand while I adjust the skeg with my left hand. If you are left-handed, you might want it the other way. If you're just used to it one way versus the other, you're free to put it wherever you want.
Um, I see some kayaks with the control slot up on the deck. You might decide that's a good place for it, so you could Mount this up here. Some people like it lower, some people like it higher, you know. It's really up to you. You're building this boat, you install it where you want. Um, but I'm going to put it that five or six inches behind the front of the cockpit and an inch or so above the shear line or the deck-hull joint. So we're going to put it right in this area like that.
So this just going to go right in here like this, and eventually we are going to use a round over bit with the a pattern bearing on it to cut this the hole where this slot is. So I'm going to start by drilling a little hole through here that I can use to start the router bit. Um, and this will also make sure I put this on the right side. I've done this where okay, I want it here on on the left side, and so I go to flip the deck over to mount this, and I mount it on the left side, which when the decks flipped over, the left side's the right side of the boat. Um, so by just creating this hole before I flip the boat over, I'll know exactly where I want it to be. So we're going to put it right in in here, and just so I want it in that area, just make some light marks where it's going to be, and I'm going to use a step drill to make that hole, and I'll make it right in the middle.
Alright, so now we know where that's going to go. Likewise, the skeg's going to go back here. One thing that's a little bit odd about how I mount the skeg is I don't mount it directly on the Keel line. I mount it off to one side slightly, and that seems weird. Um, but if you think about how the boat gets used, you're paddling ashore up to a nice Beach, you hit the beach with your bow, you hop out of the boat, you go run up to the bow, you grab the bow of the boat, and now you start running up the beach with the stern of the boat dragging on the beach. And where on the stern of the boat does the boat drag? Right on the KE line. If I have this skig box right on the key line, what happens to the sand on the beach as the boat gets dragged up the beach? It gets jammed up into your skate box. So by offsetting it an inch or so, you know, less than an inch off the center line, that solves that problem. All of a sudden, it's the boat that's bearing the brunt of the dragging up the beach, not the skeg box.
So I have in the kit there's some little Stitch holes have been drilled in the plywood here where I suggest the skeg goes. You are actually free to put the skeg kind of anywhere. The only thing you need to be sure is there's enough clearance above the skeg box for the deck to fit down that we're going to have a the cable coming out of the front here, and it's going to the cable's going to run in a piece of plastic tubing, and that plastic tubing in cable need to be able to get from the skeg box through the bulkhead to your control slot. If you had it too close to the bulkhead, the cable wouldn't have enough room to make that turn, but we'll put it back here, and I'll show you those Stitch holes.
So here we are at the back of the boat, and there's some Stitch holes drilled into the boat bottom right here, so there's one right there, one right there, one right there, and one right there. So there's four of them. They're actually on both sides, so there's another set over here, and that's if you want to mount it on the right side. We're going to mount it on the left side. I don't need to drill this hole, it's not necessary for the installation like I did on the deck for the control slot. I'm just going to drill a hole. This is going to end up in here, and it's going to be vertical. So I'm going to get this hole started there and then just turn it vertical, and this way I know when I flip the boat over, this is the side I want the skeg Box on.
So this control slot in the skeg box will need a little bit of cleaning up. Um, I've already trimmed the glass off of here, but just we want to sand that flat, and we will trim the excess cloth off of here, and we have a little bit of stuff that I didn't stick down all the way alright, and then we just want to scuff up the sides where it's going to be glued in the boat. Doesn't really matter what the bottom looks like, want to get it scuffed up all the way around, get any high spots down. So there's a few more marks on this skeg box on the front edge here. The kit had some little Stitch holes drilled into the spacers and the side panels, and you can see the remnants of that right there. There was also some I sort of sand it into them alright. There's was a stitch hole right near the edge right here, so on both sides. A little hard to see over here, but right there there's a stitch Al, and likewise on the back, there should be some that same distance up. So you can just make it out right here here and right there.
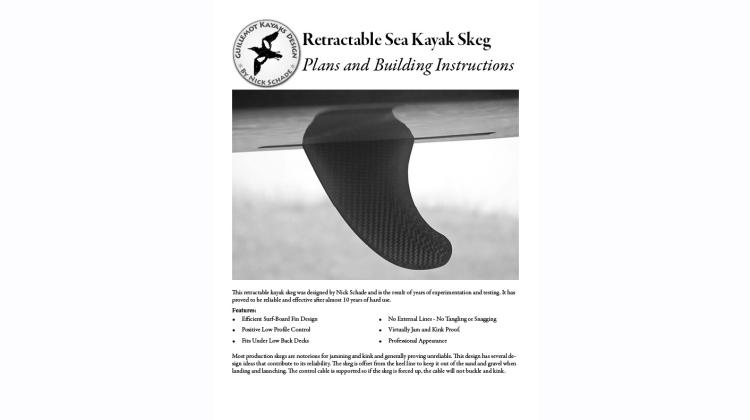
So this one is where the control cable will enter at the top of the skeg box. We have a Barb fitting that will be mounted right there feeding out the front of the skeg box. On a lot of skeg systems, the cable enters through the top top, and that makes it so the cable is pushing down through free space again to push the skeg out. The cable needs to bend above the skeg Box in order to get down into the skeg box, and that means it's a takes up a fair amount of room inside the boat, and the cable needs to bend in order to hit the skeg, and the consequences of that is the cable can buckle and kink.
Um, with this system, the cable runs along a curved surface in here, so it's supported in its bend. The cable doesn't need to bend outside of the box, it all happens inside of the box where it's supported. I've never had the cable on my skeg Box's Kink. What we want to do is drill a hole through the center of that Mark, the size of this Barb fitting right in there, and we will then install that barb fitting with some epoxy thickened epoxy and basically mount it flush in there.
So the next step is to drill that hole. So once again, we want the bit to go parallel to this top Edge, so we want to mount this so it's nice and Par parallel there. You could also use this Edge, they should be parallel with each other. Then we're going to aim right down. I using a 38 bit here which I measured to be correct for this size Barb fitting, and we've got a bunch of different Plies there, and our Mark, we're going to end up going down right through the middle ply hitting that Mark.
Alright, so that looks like it's going to thread in there okay. It's a little off center, but that should be fine. So here's the hole we drilled in the bottom of the boat, and here are the four marks right there, there, there, there. So those should be in the correct location for the skeg box to fit right down here if we connect those four into essentially a rectangle.
So find the Stitch holes, and we're just going to lightly scratch all right. So there's a line. Likewise here, and we'll connect the ends here. So now we're going to cut along those lines we just scored in there. These this is a Japanese pull saw. You could use a saber saw, you you know, a jigsaw. This this pull saw has these teeth at the front that lets me do sort of a plunge cut. So if I start scratching it, slowly work your way through.
Alright, so now I'm all the way through through. Reach down, I can feel I'm all the way through, and now I'll continue that cut following the scratched line. I'm holding the saw so it's vertical when the boat is horizontal because the skig Box wants to be M mounted vertically in there.
So I'm just putting a finger up next to the blade so I can lean the blade slightly on that finger, and that'll help it stay in that slot.
So my saw is too long to cut these ends off um. So it's takes a little bit of patience, but we can score our way through with a utility knife. So just follow those lines, lightly score it first, don't try and force it. Basically, this is a saw blade with just one tooth. So it can help to just cut away some of the material out of that slot so it's not binding up your knife as much.
Alright, so perfectly good boat now we got a hole in it. We'll see if this fits in. It'll be a miracle if it does on first go all right. It's binding up a little bit in the length. We'll just start by sanding the end down a little bit. We will grab our trusty foreign hand shoe rasp up the sides a bit again. I'm holding the tool vertically in the boat, not perpendicular the surface, but vertically.
So these Stitch holes that I marked here Mark how deep I want the box to be mounted in the hall. If we have the skeg here and it's pivoting on the pivot hole there and fully retracted, we don't want the skeg sticking out through the bottom of the boat. So these marks Mark that point, and so is if we have these marks buried into the hull um, we know that the skeg won't stick out beyond the bottom of the hull. Since this is all at an angle here, this is kind of the lowest point. This far corner back here, so as long as this point right here is in the boat, everything else will be fine. That that's the worst case point right there, and so we want to fit this whole box ugly in there so we can bur those marks. I will actually often take the rasp and tilt it a little bit in so the inside of the boat is a little bit wide than the outside of the boat that hole that way we can get a tight seam on the outside but have a place for fillet material to get down in between all right.
So that's fitting in there just fine. So we have this little jig here and a stick. We are going to clamp the stick to the jig, and with the stick in place down on both sides of the bat, we want to make sure these lines are perp perpendicular. So that actually looks quite good for first guess. So it fits down there, doesn't seem to bind up too much. I might, it's a little bit tight. I'm forcing it slightly um. I'll open up this hole a little bit more just so it it fits easily without any St on.
So this whole box is going to get filled and fiberglass in from the inside and then eventually on the outside as well. Um, so we want to prep this surface here um. So it's got some tooth so the pouc on. So we'll place the box back so remember the high spot goes in front, the where the Barb fitting goes in front towards the Bow, Low bit goes towards the stern. So these marks right here we want them even with the inside bottom of the boat. Get our jig here so the boat, the skig is perpendicular [Music] vertical, double check those marks just make sure everything sticks out here.
Actually, I'm going to go a little bit farther um. So right now I have it to the inside of the hall that's making it such that on the outside of the hall it's not quite coming out. So that's with the marks on the inside, and you see this edge here is just barely sticking out. I'd like it to have stick out a little bit more that's if the marks are visible from the outside. If we have them just a little bit below that surface, now we've got this sticking out completely, and that way we're going to cut this off flush, and this whole spacer bit will come away, and we'll have an open slot there. Um, and I think that'll work good just like that.
Now now I'm going to make sure it's all lined up, and we're going to put some spot welds in here and Spritz it with the [Music] accelerant, and now that skeg is in place ready for five before I do that. I'm, I'm going to get the on the deck, get the slot mounted. So the slot will be mounted on the inside here. Here's the hole where we located is going to be, so that will be right in the center of the slot, and we want to prep that area, and we're just going to make a Mark here to help us find that spot later on either end of the slot. There's a piece of/ quter in stainless steel tubing for the control knob. The control knob here mounts on this piece of stainless steel tubing in which the cable will run, and this control knob goes in here like this, and that's what we'll see from the outside is that smaller 3/16 stainless seal tubing at either end of the slot.
We have the quarter inch tubing that acts as a guide for the 3/16 tubing. It just protects it, it gives us a place to mount our cable tubing. This slides on onto the quarter inch tubing nice and tight, and then the cable will run inside that 316. So we want this quarter inch tubing at both ends, one end to mount the tube the control tube in, the other end to just protect the rod from getting knocked or anything.
So in my plans, I have different lengths here. You might as well just cut the thing approximately in half. So I I use a regular plumber style tubing cutter, and I'm just going to eyeball what in half looks like here. It's not that critical. This is a little bit longer than necessary, and just get a little bit of pressure with the tubing cutter enough that you can turn it, get a couple rotations in, give it a slight Twist on the knob to tighten it up, and so give it a couple spins, slight Twist on the knob to tighten it up, slight twist, and I just keep on slight twist and then spin the rod until eventually comes apart. This leaves a little bit of compressed area there. Um, I'm going to use a counter sink drill to clean that.
So here we have a counter sin, and we'll take if it's if it helps to Chuck this into a drill or drill press. What we want to see is that we can get this tube in through there. So right now the 316 to won't go through there. It's got a little bit of friction. That's okay, same thing on the other half of the tube, get that cleaned up. Let's try it on [Music] drill.
Alright, so we have those two pieces. They are going to mount like this, and this 316 tube will run straight through between. So they want to be mounted on the boat like this. So I keep the 3/16 tube inside there holding those pieces together that way. I know that they'll be lined up when I finish mounting this, throw a clamp on it, make sure it looks good from the inside, see that tube running straight all right parallel to the edge. That's good. Once again, I'm going to spot weld, okay.
So when I put these tubes in, I made sure they were kind of flush on the inside, and right now the 3/16 tube is still inside there, and if I take those off all right, that holds. Now I'm ready to Glass the control slot in. I'm first going to paint some unthickened epoxy over the whole thing. I'd like it to Wick in between the deck inside and the flat face of the control slot to facilitate that. I'm going to heat the area up. This will lower the viscosity of the epoxy when I go to paint it on, and that will help it Wick in to that Gap there. I didn't put a whole lot of CA glue there, just enough to hold it in place but not enough to interfere with epoxy getting in there. I'd rather have this glued with epoxy.
I'll paint some epoxy on here, then mix up some fting mix and put a tiny fillet all the way around here. It doesn't need a lot of fillet skeg box will take a larger fillet. So that's nice and warm out. I've got epoxy mixed up. I'm just going to paint
I'm just going to paint that on there liberal amount. My goal is to have some Wick in between the deck and the Box the slot. So let's just paint the whole thing a little bit and just give another little glass of heat to help drive in in a little bit farther.
Now I'm going to mix up some filleting mix and put a little bit of fillet around there, fill up these slots between the staves of the box, and get a little fillet around the end of the stainless steel tubing. So I've got some filling mix mixed up, this is just epoxy with wood flour. Going to cut a small hole here, I don't need a big fillet in this, you know, something like that, and then we'll put a fillet all the way around on the ends of the stainless steel tubing and just put a little bit in these gaps here.
So I have another piece of bias cut cloth here, again bias cut means the weave is cut at a 45° angle, going to make this so it overhangs the ends about an inch couple cenm lay on there, and the fillet still wet and doing this immediately after putting the fillet on, and now we're going to coax this down around there. I want to wet out all this fiberglass, make it go clear, look for bubbles, have the cloth wrap onto the end of the stainless steel tubing a little bit, and just smooth it out nicely. So that'll be on there good and strong.
So now we're going to put a fillet around the perimeter of the skeg box, but first I want to again like we did with the control slot, I want to heat this area up. I want all that end grain in the hole panel to have some epoxy in there. I'm just warming this area up. I'm going to brush on some unthinned epoxy and want that to run down through run into Wick into the end grain of the all panels. I'm jamming the brush down in there trying to get it to spread nicely in there, add another little heat. I want a bit larger fillet on this than I did on the control slot, so I'm going to cut the tip of this off a little bit bigger, and then we'll put a remember this skeg can get quite a bit of force on it if you're surfing or something there some side forces pushing on the side of the boat put that fill it all the way around. And then we'll shake that fill.
So this is like a 1 in fill, filling tool was good for this side. It's a nice little there, this side could use a little bit smaller one because it's a sharper angle. Yeah see that makes a nice F right there, some of that squeeze out and still soft. So we will cut a few more pieces of bias cut cloth to wrap around that.
So I have a several short pieces of bias cut cloth here, once again cut on a 45° angle. These are 2 to 3 Ines wide, so 4 to 8 cm something like that. It's not super critical we just want a nice coverage down onto the hall and up onto the side of skeg box, and these fillets once again are still wet. We're just going to lay this right down on there and brush some epoxy on there. So I'm not going to press hard because I don't want to mess up that fillet. I got a nice fillet shape there. I want to keep that nice shape, so I'm just going to lightly brush to get epoxy onto the glass, another piece on the other side.
Alright, I'm going to cut a shorter piece to wrap around the front, again this bias cut cloth can wrap in some amazing ways, but keeping it short will give it a little bit better opportunity. So once again, epoxy is still soft, so we don't want to jam into it too much, let just sort of coax it down into place, get some epoxy on that'll lubricate the cloth ability to to store.
Honestly, I I think the the glass around the front here is probably Overkill, get a couple layers of Glass on either side with that good fill it, you're probably going to be fine. But uh, give it a go, trying to get it around the front and the back let, use this piece wrap around the back. In other videos, if you've watched, you may have seen me use some carbon fiber on each side of the skeg stiffen it up a little bit. Again, probably Overkill. Right now I've got one layer of Glass on either side with the fillet, that's probably enough um, but I'm just going toe go ahead second layer down on both sides.
If you're interested in being neat about this, you could put masking tape all around and use that to control where the epoxy gets, then trim off the excess glass when you're done, a good coat of epoxy on there. This will be very strong, and if there's any sharp bits of fiberglass sticking out when we're done, it'll get sanded off. While I'm here, I'm going to put some epoxy in that hole start to seal up that ingrain in there.
Alright, so that's the skeg box mounted, let's do a final inspection, look for any bubbles or wrinkles, and that fillet down there is still soft so you can manipulate it a little bit if you want to. So a couple things to handle today um. I neglected to put the Barb fitting in here. This will end up being threaded into there. Um, I I painted a little bit of a oxy in there just to try and get some of that end grain sealed up. Um, we will butter this up with a little bit of thickened epoxy and crank it in there, and that should seal it in and hold it in place. It's good to hit these metal fittings with a little bit of acetone just to clean them off, and we'll use an acid brush, a good amount of epoxy around there. We don't want to gum up the hole, hardened epoxy in there made it a little bit hard to get in there, so I'll redrill it.
Alright, so that should do the trick on that. So I left the rod on the inside of this just to make sure these two tubes were lined up. So I'm just going to drive another Rod through there, pull that piece out. The next thing we want to do is I forgot to put in the cheek plates, which are little pieces here that help hold your butt in the center of the boat. So here are the cheek plates, they go mounted here on either side of the cockpit, and there is a stitch hole right here which is about 4 in from the back of the cockpit. I'm just going to use that as a mark to have it as the back of the cheek plate, and then we want it running straight forward so parallel to the side of the boat here parallel to this and then vertical as best we can, just one on each side like this.
First we'll just clean these up a little bit. I've already sort of cleaned up the edges of these on the power sander, but I need to prep the surface to accept the foxing fiberglass. As you remember, we used a little bit of Peel ply on one side of this, so this is already in pretty good shape. So it set fiberglass here, the different noise it makes, this is already roughing first, and likewise down here where I'm going to [Applause] mount this will get mounted. There's that Stitch hole right there, just like that should end up with a little bit of a space on this side between the edge of this and the edge of the coaming.
So we'll just put it in like that. So in order to mount that there, we will first tack it down with a little CA glue. So I have CA glue here. I'm just going to put a line down the bottom right there, line it up with that dot, get it in place, make sure it's vertical and parallel to this Edge, then so that's not super strong right now, but it'll hold until we get a fillet on both sides and glass.
So we're back to filling sort of like a 38 in wide hole here for this, and put it on both sides. So we want a pretty good fillet there. It's going to be a little bit smaller on this side, a little bit beefier on this side, just making it smaller on the visible side here. We have just a little shelf there, not a lot of room for a big fillet there, but this takes quite a bit of force. The seat back rest will hang off of this, and if you slide your butt back and forth inside the boult, this is going to take some of that Force. So I'm shaping the fillet [Music].
So we're going to put glass on both sides here. I'm going to put a little bit of Glass on here even though eventually we're going to put the coaming around here and glass from the top of the coaming down the Riser around to the underside of the deck, and some of that glass will wrap onto the side of the cheek plate. I'm going to put one layer on now just because the fet's wet and I want to have that be nice clean surface there when I glass onto it. We'll start with that.
So here's a piece of bias cut cloth off just going to lay that into that and paint it with a little bit of epoxy all right. So now we've got that fillet under there. It's nice and smoothed out, and we will glass the other side. So these pieces of bias cut cloth are 2 to 4 in wide, which is 4 to8 cm wide something like that, you know, just approximate. And I'm putting it up onto the cheek plate half the distance and the other half down onto the deck, and that should make a good strong connection there. And I'm going to put two layers, and I'm going to offset this so the the height of this one won't come quite as high as the height of the other one, but it'll go onto the deck a little bit more that way we're sort of making a little strain relief there, used a lot of epoxy, you get the first L layer wet so it probably won't take as much to get the second layer wet.
So by having the fillet wet here, it doesn't need to be too neat, you know, you want to do a neat job, but if it's got a little bit of spikiness to it, the epoxy on top of it will smooth everything out.
Now for the second layer, and again I'm going to offset so the top Edge is here, bottom Edge is over here. I will offset this a little bit. I'll actually go a little bit higher with this one than I went with the other one so that is tapering that up and tapering it down there, a lot of epoxy on there and out mostly soak that up with the second piece.
Alright, that looks good, one over there looks good, just let those set up and trim off the glass later. So that's all interior system stuff. By Interior Systems I mean things that need to be installed on the inside of the boat before you can put the deck on. So what that means is the next episode should be putting the deck on. This episode happened over a couple days, but I could have done it all in one day if was a total of two or three hours something like that of work, could have been something I did in an afternoon. Again, I didn't have Bill come over, was a bit of a drive for him to come over just for the short amount of work we were doing, he missed out on seeing how to do that. So when he has to do his boat well, he'll have to figure it out on his own, but we're ready to put the deck on, and next episode bill will be back.
One thing I want to say about this series of building the Petrel Play, I'm really going into a lot of depth, and I want to really thank the people that are watching all the way through. If you've got to this part of this video, you're pretty hardcore. This isn't going to be the most popular series of videos I'm doing on YouTube, let alone what everybody else is doing on YouTube. So if you're watching all the way through this, thank you um, you're kind of the hardcore. This is some pretty indepth stuff, not necessarily that interesting to people who are just looking for some light entertainment on YouTube. As a matter of fact, in the past month, I've lost some subscribers, not a lot like six uh, so not a big deal for me.
This is a project that I feel is going to have some long-term benefit for me. Really what I'm hoping is people will watch this and see that okay building a kayak is something I can do, but it's going to people who are already interested in building a kayak, and I hope people who are in the process of building a kayak stitching glue kayak or any kind of stitch and glue boat will find this information useful. But for that to happen, it does need some visibility on the YouTube algorithm. So all those YouTube things you can do the Subscribe notifications hit like all that stuff really helps what I'm trying to do here more work worthwhile just by increasing the visibility making it so more people know this video series is here, and they can if they're interested in building the boat, they can benefit from the information I I hope I'm able to pass on to you guys here.
Once again, do all that great YouTube stuff, notifications, like, Etc. If you'd like to support this series in the more substantial way for me, you can always go over to patreon. I really appreciate that, but really what matters to me is you folks are getting good information out of this, hopefully you're finding it informative, and it will be helpful in whatever project you're working on. Once again, if you're watching to this point of this video and this point of this series, you're kind of the hardcore, and I really appreciate you sticking around for this, but until the next episode, thanks for watching and happy paddling.