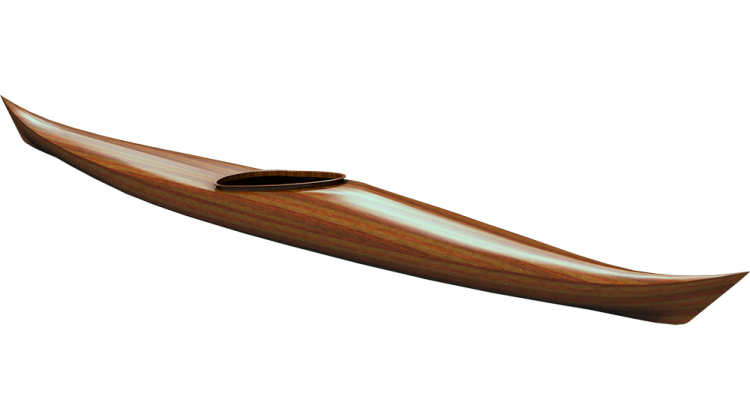
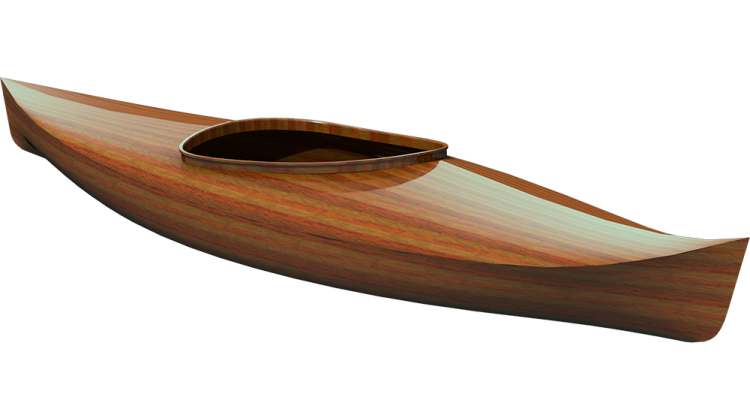
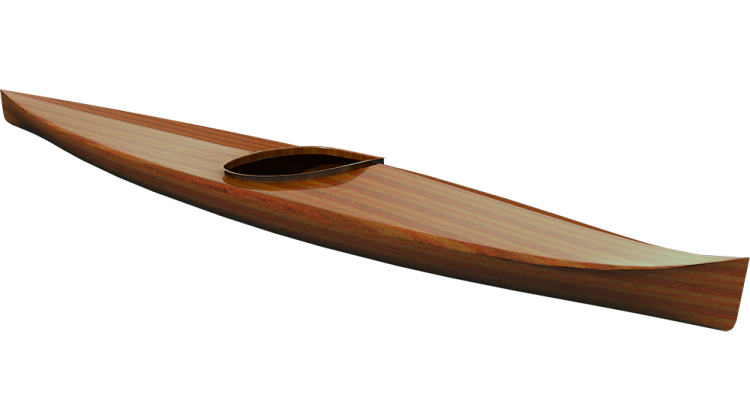
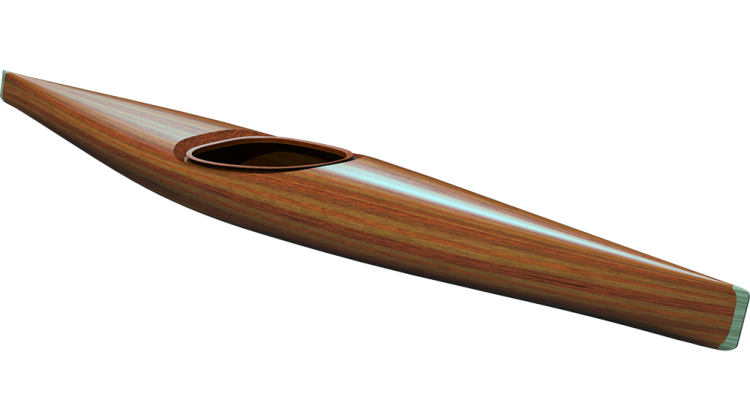
In "The Guillemot Kayaks Workshop" with Nick Schade and Bill, we dive into the advanced stages of crafting the Petrel Play SG, a stitch and glue sea kayak. This episode kicking off with the necessary preparation of the hull for fiberglassing, highlights their meticulous approach to boat-building. Initially dealing with slight gaps at the bow and stern by injecting filleting mix, this episode is rigorous in detail about the process, ensuring even minor imperfections are addressed before fiberglassing.
As detailed, the process involves various stages, starting from addressing the gaps, preparation through sanding and planing, and eventually fiberglassing. This meticulousness extends to the application of fiberglass, where the cloth is laid diagonally, not merely for conservation of materials but also to assist in easier wrapping and conforming of the cloth to the boat's contours. The technique also entails thoughtful application, leveraging gravity for smoother application outside the boat, contrasting the challenges faced when working on the interior.
The episode also delves into the nuances of working with epoxy, from mix preparation to application techniques aiming to avoid over-saturation yet ensuring adequate coverage for a smooth finish. It entails using brushes and rollers effectively, with emphasis on avoiding contamination and ensuring effective spread without excessive use of materials.
Nick's tutorial is comprehensive, encapsulating years of experience in a digestible form for both novices and veterans in kayak building. Their effort culminates in detailed advice on dealing with the final touches, particularly the crucial steps of applying a fill coat for a sleek, smooth finish, highlighting the blend of technically precise yet artistically enriching journey of boat building.
Hey, welcome back to The Guillemot Kayaks Workshop. I'm Nick Schade, and Bill and I are continuing to work on the Petrel Play SG, a stitch and glue sea kayak that I designed, and the kit is made by Chesapeake Light Craft. In the last episode, we prepped the hull for fiberglass. We did planing and sanding on the chines, got rid of drips, etc., and in this episode, we will do the fiberglassing.
Before we get to the fiberglassing, there's a little bit of a gap up in the stem at the bow and stern of the boat, where we didn't shove the fillet deep enough into the stem. So, we're just going to mix up a little bit of filleting mix and inject it into that crack, smooth it off, and then while that's still wet, we'll glass right over it.
So, let's get directly to it. Okay, I've mixed up some filleting mix, not a very big batch. I've put it into my piping bag and I've cut a very fine tip on it because I want to jam it into that space in there and fill that space up as much as I can. So, I'm going to stick the tip in there and then squeeze in some of the mix until it comes squirting out. If I wanted to, I could put a little couple of drops of the stain into this, and make this mix have a little bit of a stain color.
Okay, so we've sanded everything out. We are now ready to start fiberglassing. Yay, so that you know, it took us a while to get from where we started this morning, basically the hull as it stood after we glassed the interior. Then we brought it over, we started getting rid of the forms, getting rid of the drips, then we did the seams, and then we sanded and took care of touching everything up. So, any thoughts about how the first part of the day went? It took a quite a little bit of time to sand off all these bumps, but yeah, when all those bumps are removed, when the hard edges are taken off of the form, when it's given a light sanding all over, the boat really starts to take on some beautiful lines. It really looks nice now. Yeah, I think it's looking great. Yeah.
So, one of the beauties of glassing the outside of the boat is it is substantially easier than the inside of the boat. Gravity is kind of working in our favor. Imagine how you'd get bridging here. Yeah, you can't because as you pull the cloth, it gets tighter to the boat instead of getting pulled away from the boat. Previously, to sort of be conservative with cloth, we ran the cloth across the boat. Here we'll run it lengthwise, so just one big sheet. One big sheet. I will have us do it sort of at a diagonal. So, we'll start with the roll all on one side and then sort of go diagonally across the boat, so we'll end up with the roll mostly on the other side. That does two things: it allows for a big triangle back at this end of the boat when we go to roll cloth onto the deck. We will be able to sort of nest the deck cloth next to the hull cloth and be a little bit more conservative with the cloth. Not completely necessary.
We should have enough cloth in the roll that we could do four 14-foot pieces so lengthwise on everything, right. But I like to be conservative with it, so we have that way of sort of nesting the cloth together, and the fact that the cloth is going diagonally across seams makes it a little bit easier for the cloth to conform. If you have cloth going beyond it going 90° and straight over an edge, if you don't have that edge well rounded, it can be hard for the cloth to get around it, where if you run it a diagonal to that edge, it effectively reduces the angle that cloth has to go. So, you mentioned the idea of running over a bump at a diagonal, right. It's kind of the same idea. Right, we shouldn't need to run the cloth at a diagonal to save cloth or to make it easier to wrap the cloth, but it is something that does save some cloth, and it does make it easier to wrap the cloth.
So, I think we'll do it that way. So, let me just. I've got my scissors. We've got our roll cloth right here. I will just make sure I've got enough to get over the edge there, and now I'll start wrapping or rolling the cloth down here. If you just want to keep this from falling on the floor. Sure. You know, I usually do all of this alone, so I have my ways of doing it alone. Having two people, like having Bill here, I could have Bill on the other end of this roll helping me out. But let's sort of do this as if we were working solo. So now, I've got enough to get the length of the bat, instead of cutting straight across here. I'm going to cut down the length of the boat a bit, and that way I will be able to nest the deck cloth in here. I don't need to come to a sharp point eventually, but I've got that much length that I'm saving in this cloth that I can use when we go to do the deck, and now I'm going to trim off the excess here. I'm going to let it hang down a fair amount. I don't want to cut it too short, and B, this will sort of absorb some of the drips and keep them off the floor.
So, as you may notice with my floor, I try very hard to keep it. You could eat off it, and so this cloth I'm cutting off is perfectly good cloth usable for things like those bits and pieces we were working on the other day. Carefully put that away someplace. And like the inside, if we're able to get this cloth to lay smooth on the boat now, it should end up being wrinkle-free once it's all wet out with the epoxy. So, I'm just going to sort of gently pull on it to get rid of most of the wrinkles, and I'm going to grab a chip brush and work some of the remaining wrinkles out. So, like we were doing before, wrinkles that go up and down will move to the left or the right, and wrinkles that go left and right will move up and down. Does that make sense? It does.
Lots of people want to take and put their hand on this and smooth everything out with their hand. Chances are your hands are clean enough, but they may not be, you know, if you've been sweating a little bit. The worst thing for this cloth is to get wet at this point. So, a little bit of sweat or just the oils from your hand can interfere with the epoxy soaking into the glass. Doing this with brush, we're not adding any contamination to the system. And yeah, there's some sort of word wrinkles in the cloth, which will disappear a bit. Again, this cloth, we're wrapping it on the outside, and gravity's working with us, so we don't have to worry too much about bridging. That's not going to be an issue today, but we still don't want to overload the cloth with epoxy. We'll end up using the squeegee, the using the rollers again.
And one thing I wanted to mention, so we've got these rollers. I neglected to take this roller off at the end of the day last time we were fiberglassing, so this roller is permanently on there, hardened up with epoxy. I'm not going to really be able to get that on. So, hopefully, I'll have the presence of mind to remember before this hardens up to pull the roller off the frame. We'll use a roller tray again. The goal with the roller is to get the epoxy out of the tray onto the boat.
We're not trying to wet out the whole boat. We're just trying to get it applied to the boat a bit, right. Then we'll use the squeegee to spread it around. You know, I've said this in all my videos and to every class I teach, it can be hard to get through, but you know, our inclination is to go ahead and make it look perfect with the roller before we move on to the next step. We really just want to use the roller to apply the epoxy to the boat, and then use the squeegee and let time soak the resin into the boat. We don't need to use the roller to force it into the right. Last time you demonstrated that it takes a minute or so for it to it takes a little bit of time. I was.
Go ahead and mix up some epoxy here. Get gloves. I do like to, when I'm using the yogurt containers, I like to just clean them out, make sure there's no leftover yogurt, or in my case, hair from Eli in the container. And we're again, we're not going to mix up a large batch of epoxy. I'll go for, you know, just over half an inch in the bottom of the bucket. Give this a good mix, scrape the bottom, scrape the sides, get into the corners, mix it vigorously.
Now we're just going to take this whole bucket and upend it into the tray squeegee. So, like previous times, we will start in the middle and sort of work towards the ends. So, you want to try rolling some out and see how it goes? All right. Yeah. When we do this, we'll do the bottom and the sides all the way down. We want to go, basically, we want to go from the keel line to the shear line before we move down the length. Okay. Put that tray down and put it on that. Okay. Yeah, so you don't need to spread it thin or anything. We just want to get some on there. Just get it. Yeah, because you put it on at first, and you don't see it, and it doesn't seem like you put any on. Yeah. But then, and go ahead. Basically, get that tray empty.
But so, I've done a little bit of squeegeeing. We could use more here. It's a little bit sparse. How about the side over there? Do you need more? Yep. We'll see how that spreads. Get rid of whatever's left in that tray right. And I'll mix up some more. So that was a half inch deep that got like 18 in. And as soon as you've got the tray empty, go ahead and do some squeegeeing. Okay. Pay attention to how much you're putting on there and, you know, try to remember, okay, this got me this far, right. And, you know, I needed more, needed less. So, I'm just going to find some places where things looked a little dry after squeegeeing and add a little bit extra. I'm not trying to make it perfect. I'm just looking for some dry spots. But judging from the way you move when you do this, speed is of the essence. Well, it's not. No, you know, I try to get it out quickly so I have time to do the important bits.
You know, I don't want to make it feel like you've got to be in a screaming panic the whole time this is happening because you don't. Okay. But if you, you know, concentrate on the parts where it does matter, trying to get that idea that the squeegee is or the roller is just about applying epoxy to the bat. It's not trying to do the final work, just transferring material. Yeah. So, you know, we're not moving so fast right now. Right, right. This is the important bit. This is where we're doing our fine work. That squeegee isn't for the fine work. I'm doing that quickly because I can be sloppy there. It doesn't matter. It doesn't matter. I'm not trying to do high quality work at that point. You know, taking this roller, getting it a little bit of sloppy, and then there it goes. You know, I'm not, I'm not rushing with this. I'm just not wasting a lot of time with it either. Right. This isn't where I want to spend my time with, the getting epoxy out of the bucket onto the boat. I want to spend it on the squeegee.
So, my normal process, if people watch my other videos, is I apply the epoxy either by dumping it on the boat or with a brush. And part of the reason is I don't know where to put the roller tray while I'm working with the brush. I've got the bucket, and I can put the brush in the bucket, and, you know, I have enough hands to do everything. I can come back with the squeegee on the other hand, where with the roller tray, it needs more hands than I have. I have to work on that. Yeah. But you see, Bill hasn't tried to wet out the whole thing. There are some spots where it's a little dry, and he can come back, and like he's doing, add a little bit more. And, you know, we're giving it time to soak into the bow, so we see how much we actually need on the bow, and then we add more as necessary.
And I suspect this patchiness annoys some people and frustrates some people. But again, if I take a squeegee over this, see, most of that patchiness went away. There was already enough epoxy on the boat. It's just a matter of getting it to the specific spots where it's necessary, and the squeegee does that for us.
As I'm getting down towards the end here, there are some wrinkles appearing. You see that wrinkle there? Yep. If I just go over that, it tends to not do anything to fix it. If I took and grab some cloth down here. Oh, yeah. Pull right out. So there's too much yarn there, and by pulling on the yarn and bringing it down towards the end of the boat, it will disappear. So I'm just looking for S of starved dried spots. And then I've got enough epoxy just on this brush that I can just give them some dabs. So let's get it wet out close to the end, and then I'll show you the process for dealing with the last bits. Okay. Should I put this down here? Let's use up what's ever there wherever it's needed. This. Let's put some over here, a couple of rolls right there. Yeah. I don't like leaving mixed epoxy sitting in the tray, stiffening up. Once it's spread out on the boat, we've got a lot more time to work with it. So getting it out, get, like I say, out of the bucket onto the boat.
All right. Let me show you the process here at the stem. Okay. So we've got a lot of cloth left here. Sure. So I'm going to take, get it nice and even on both sides, and then trim it, cutting through both layers. We're going to make a spot up here where they sort of overlap. So I'm going to cut up this way, so right up tight against the keel line there. MH. Just fold that back, wrap this around. So there's still a little bit in this mixing bucket, so I'm just going to use that to wet that out, settle it down. I'm trying to get rid of all the wrinkles on this side, and take this piece, wrap it around. And now we'll get this Co this down this side, and there's a spot right in here where we don't have any coverage. We're going to come back at a later date and put a keel strip down.
On the Petrel. The 17ft Petrel. You have a much more gradual overhang here. It doesn't come quite as plum. There you can get that to lay down all in one piece if you roll it out diagonally. Okay, the curve is such that it can make that in one move without any of this cutting. But once that's wet out, you don't see the seam.
You know, if you look closely, you might see the seam. You do want to be careful on this ragged edge where I cut it will tend the more I work it, the more likely I am to start to pull out some yarns. Oh, yeah, yeah. And those can start to make a mess. So I try to minimize how much I fuss with it. But I need to fuss with it enough that it lays down.
All right. So we've got this end. Let's finish up that end, come back, and do the grunge cup on the whole thing. Oh, so, that's good the way it is for now. It's good. Okay. Again, if we stopped and looked at it for a long time, then it would start to get harder to deal with.
Let's do a couple of rolls over both of these areas because it's looking a little dry here and there. And here, a little dry with a wet roller, just one roll right down through. See, how that's enough. Oh, yeah. It's more than we need. This side. So again, we've got the occasional dry spot here. I've got a wet brush here. I'm just going to go over those spots, and I'm not trying to make them perfect again. I'm just making sure there's some epoxy in that area. I'll come with the squeegee and even that out.
All right. So you see these wrinkles over here. How do you think you want to deal with those? I would see that. Want this bit. So which way are the yarns running on this? This way. Yarns running this way and this way, right. We got 90° plain weave cloth here. So, so yeah, yeah. This is too much yarn going this direction. Yeah. And follow those yarns. Where do they go? Go this. Yeah. Where's the closest place they go? So, instead of trying to get them off the edge of the boat that way, we can pull them off the edge of the boat this way.
You want to try and deal with the stem when you're ready there. All right. This stem is going to be cut the same way. Yep. Get everything wet out all the way to the stem. So now you want to get this sort of running off the end, nice and clean, and then trim it off so you have enough to overlap. Yep. That's looking cool, huh? It's looking cool. Yeah. It's looking great. All right. So you just go right up through here. Yep. Yeah. So you see where the edge of the end of the stem is. Give it two in. Yeah. Inch and a half is good. Inch and a half, right about there. Follow that stem right on up. We want to make a little snip going to where the glass touches here, going just to where it touches. Yeah, right. Just a sliver off of there. Beautiful. So then gently peel one side off. Yeah. I can see where you don't want to mess up the fibers, and then grab a brush. All right, now we got to take one side and lay it over. Yeah, and then we just want to lay this down. Try using the brush, the Wet Brush, to lay it down. Okay, oh that looks better. Nice, fingers are not the tool. That sometimes they are, sometimes they aren't.
So, that little pucker up at the top, yeah, see what you can do with that. And we are going to have a place up here that isn't covered, so that's a place to deal with irregularity. Okay, all right, so now you got one side. Yeah, so right, huh. There you go. All right, and just accept that this is going to be a little bit rough up there, and you can take your squeegee and lay that all down nicely. See, you don't want to accept what I said, do you? I don't. Hey, that came out all right, yeah. That looks good.
Okay, all right, so everything's wet out now. Is grunge cup top, once again, for those who weren't paying attention before, I've got a paper cup with a slit cut through the edge of it right here. So, I'm going to use this to scrape down the boat, taking off the excess resin. So, I've got a pile of excess resin on the edge of my squeegee. I'm just going to run that through the paper cup. So, we'll start in the middle, okay, and work toward each end and see how it goes.
And if you've done a good job on the initial wetting out, we shouldn't end up with too much excess. You got to be a little careful up here where you run into these – yep, where we did that overlap, yeah, edge of the cloth hanging out there that wants to fray, and it did a little bit. Run the whole thing through the chipper. Okay, yeah, that was great. All right.
So, I want to remove the roller from the frame, so that patch came out nice. You can see, yeah right, it tends to trap a little bit of air in that overlapping area. Oh, but yeah, the, the, the color there is fine. Yeah, yeah, yeah, you notice it, yeah, yeah. You know, if you know what to look for, you can see it, but nobody will notice. All right, so that's, that's the, I think, one of the more satisfying things in the process, is the glassing the outside of the hull. Yeah, it just looks so sweet when you're done.
Yeah, yeah. So, this morning, where did we start? We started. We just trimmed the glass on the inside of the deck, then we put that aside, got the hull out. We removed the forms, we filed down the drips, we planed the keel and the chines. We rounded them over, then we worked on the stems, rounded that over, touched up the stain, and then went to the fire.
So, the next episode, I haven't decided exactly what we'll do. I think we'll do some sort of small tasks that will get us ready for some bigger tasks. So, I think it'll be more bits and pieces, working on the skeg a little bit, starting to build the coaming, and a variety of other small things. So, if you're enjoying this series, hopefully you're finding this useful to see a lot of the processes of stitch-and-glue boat building for kayaks. Again, I've mentioned before, we're building the Petrel Play SG, but there's really nothing specific we're doing now that is different from any other boat. The fiberglassing, the way we apply epoxy – you know, other people might have a different way to do it, and I'm not saying mine is better, but this is the way I go about doing it.
But any boat you're building, whether it be another CLC design, one of my brother's designs, the Shearwaters, or the Wood Ducks, this is all the same process. If you're building your own design or something from somebody else, it's the same process. Hopefully, you're finding this useful. If you are and you want to see more of these, hit subscribe, turn on notifications. The next episode should be coming out if you know, a week from today. You know, this will be released on a Friday. I'm trying to release them every Friday until we're done with the project. And if you want to chip in for a little bit more direct support of making these videos, I have a Patreon site where you can chip in a small amount every month toward the production of these videos. But I guess until next time, happy paddling.
Fill Coat:
So Bill's gone home for the day, but I'd like to get a fill-coat on here. If you've watched some of my other videos, you've probably seen me do fill coats before, but basically, what we're doing is we are trying to fill the weave. We were careful to not put on too much epoxy here, but eventually, we want to make this boat smooth and shiny. So, at this point, we have the distinct texture of the fiberglass cloth, and we want to start filling that. This is a few hours after we finished the glassing this afternoon, and the cloth here is still a little sticky and basically it's not fully cured, but it's hard enough that it's not going anywhere. So, I'd like to apply a fill coat on here and start to get this texture filled in.
So, I've mixed up a batch of just regular epoxy, unthickened, and I've got a brush. And I'm going to just systematically go down the length of the whole boat and apply a fairly heavy coat of epoxy here. I'll start by brushing it on horizontally, then level that out by brushing vertically, then tip that off to even it out, make it smooth by brushing horizontally again. Then I just move down to the next section of the boat. I'm using the stitch holes as sort of guides for how far down the boat I'm moving each time, moving about a foot at a time, or maybe this time I guess I went three stitch holes, and the stitch holes are every 6 inches, so that's 18 inches.
So, I'm just going to go down the whole length of the boat like this. Again, repeat that I'm brushing it on horizontally, just trying to distribute it on the boat, and then level that out, even it out with vertical strokes, then come back and tip that off with horizontal strokes. And that's just sort of getting rid of the brush strokes from the previous steps. So, then move down.
We could have waited until tomorrow and just done it first thing in the morning. The epoxy would have been fully hard by then but still wouldn't be fully cured, but you know, 12 hours later, so it would be somewhat soft, and there would be a little bit of the epoxy bonds left to be bonded to chemically, but doing it a few hours after is a little bit better. And tomorrow's the weekend. They'll be doing stuff and just figured they get this done.
For so this is an unnecessary step, but it can make for a slightly clearer finish. I'm just going to go over the whole thing with the torch, which will pop up, pop some of the bubbles, and make them rise to the surface and pop. Okay, that's it for the fill coat. We'll just let this cure nice and hard, and again, you see the drips running off the edge here. This excess cloth tends to soak up a lot of those drips.