Spot Welding Process in Kayak Construction
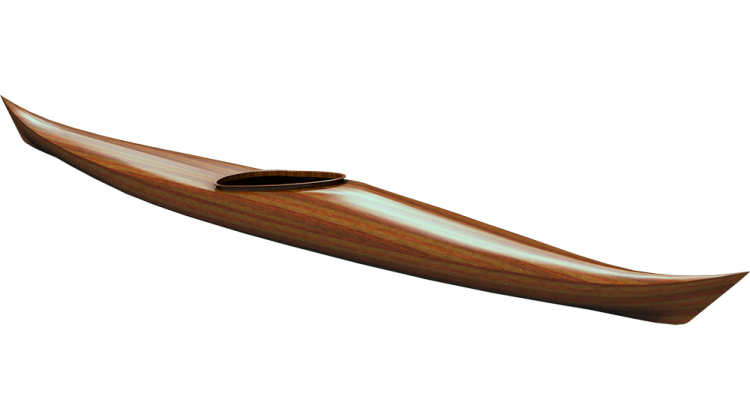
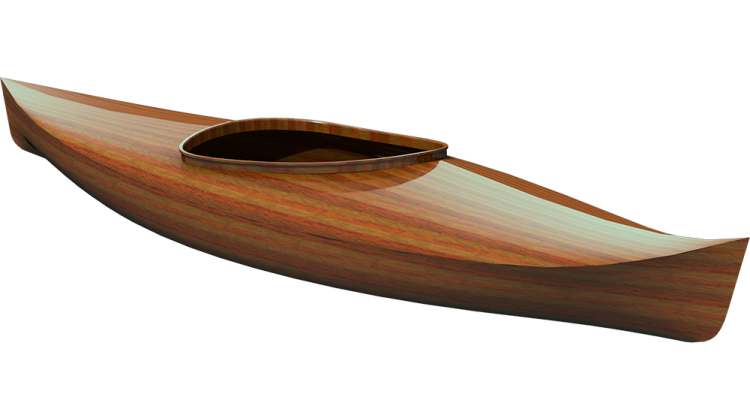
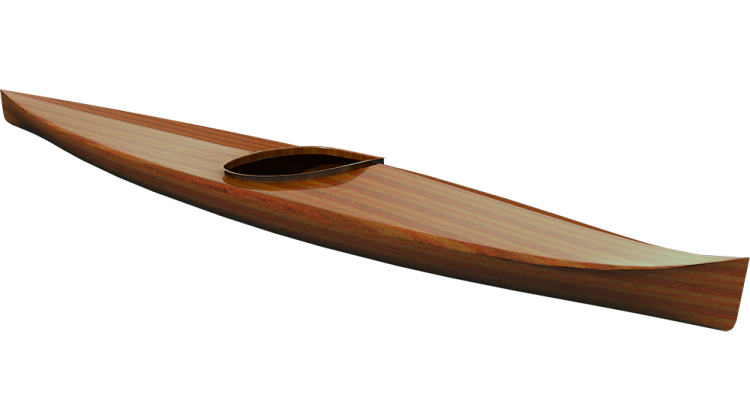
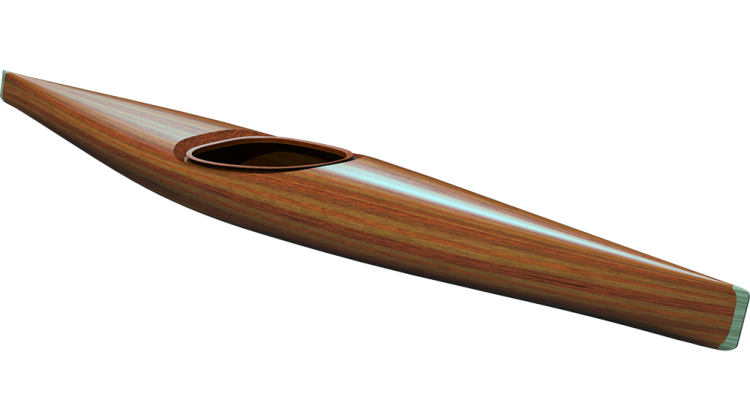
In the recent segments of The Guillemot Kayaks Workshop, hosted by Nick Schade, the focus remained on the construction of the Petrel Play SG sea kayak. Collaborating with his friend Bill, Nick demonstrated the crucial process of spot welding the plywood panels using cyanoacrylate glue or super glue.
Achieving Smooth Seams for Aesthetic Excellence
Emphasizing the importance of exterior aesthetics, Nick guided viewers through the spot welding process. Smooth and aligned seams were deemed critical for the overall appearance of the kayak. Instead of relying solely on visual inspection, he advocated for feeling the seams for smooth transitions. The chosen method involved applying small dots of super glue along the seams, creating a temporary bond that would facilitate the removal of wires.
Navigating Challenges at the Ends
The workshop delved into the intricacies of spot welding, particularly in challenging areas such as the ends of the kayak. In these confined spaces where seams lacked a natural groove, Nick demonstrated a technique involving flexing the seam to expose the top edge and applying glue for a seamless connection. This process required finesse and attention to detail to ensure a tight fit without excess glue spillage.
Overcoming Challenges with Patience and Force
Schade addressed potential challenges, assuring viewers that some force could be applied to adjust wood pieces without risking damage to the boat. Stressing the importance of patience, he highlighted the artistry involved in achieving the desired results in the kayak-building process.
Attention to Detail at the Ends
The final segment focused on the ends of the kayak, where meticulous attention was required. Nick discussed the necessity of gluing the stem to prevent unexpected issues during the wire removal process. Careful consideration was given to getting glue into the seam without saturating it, striking a delicate balance for a robust bond without hindering subsequent steps.
Reflections on the Day and Looking Ahead
As the spot welding phase neared completion, Nick and Bill reflected on the day's work. Bill shared his insights, expressing interest in the technique of wire tensioning and its contribution to achieving well-aligned seams. Nick acknowledged the deceptive nature of the progress, noting that while the kayak's shape took form, substantial work remained, including glassing the interior and exterior, working on the deck, and creating hatches.
Hey, welcome back to The Guillemot Kayaks Workshop. I'm Nick Schade, and we're building the Petrel Play SG sea kayak with a kit from Chesapeake Light Craft. It's my design, and they make the kit for this. They've supplied me the kit, so my friend Bill and I are working together to make this kit. So you can see how it all goes together. Bill has never built a boat before, and so he's here as a stand-in for you guys. Hopefully, he asks the questions you might ask, and in that way, you get those answers to those questions while we're building the boat.
If you've been watching all along, you know I've taken one day of boat building here and broken it down into four separate episodes. So the easy-to-digest chunks. The first episode was assembling the plywood panels to make the hull. The next episode was setting those panels up in the forms to start to form the hull shape. And then the previous episode to this one was stitching those panels together, really defining that shape, getting it where it needs to be. And in this episode, we will take and spot weld those panels together. And by spot weld, I mean we'll use cyanoacrylate glue and put little dots along the seams. Cyanoacrylate CA glue or super glue is a quick way to get the whole panels held together so we can take the wires out. And then in the next episode after this, we will be filling the inside seams and fiberglassing. By getting the wires out, we have a clean inside surface that we can do that. And the quick curing of the CA glue lets us get right to that.
As I said somewhere in one of these episodes, I can often get from the unboxing to the fiberglassing in one day with a class full of people. So that is a bit of a rush to do that. You guys working on your own can do it at a lot more leisurely pace. And I think the way I've broken these episodes up, you can see that as one day at a time. Some of the episodes you can combine into two days depending on how much time you have. But I think it's a sort of logical way for you to break it down. So let's get to spot weld then.
So that's all the stitches in there, looks pretty good. What we're going to look for as far as getting these seams aligned isn't what it looks like on the inside, it's what it feels like on the outside. So when we're lining up these seams, this wants to be nice and smooth across that seam. And so it's really the most sensitive thing you have for that is just running your hands across. You'll feel that as a nice smooth transition. Where if I have it a bit this way, there's something snagging there. If I have it this way, it's overhanging. You can – we want that nice and smooth and continuous. So it pays to sort of inspect everything before you get too deeply into this. And if you find a place that's really problematic, you might pull the wires out, redo them. But if it all feels pretty good, this place, we have the sheer coming down here. And so these two chines here merge into one, and this will probably be a little bit rough. We still want to do our best to get everything lined up so it's a best-fit scenario. The ideal sheer here would taper down to absolutely nothing, and we have it tapering down to something of a 16th of an inch wide. So there's probably going to be a 16th of an inch gap at the end of that. Then once we get that and it feels really good on the outside, we'll take and we're going to put across each seam every two inches or so, just a little bit of superglue. And you see how that flows down into the seam.
And since I was pushing around on that, I'm going to be a little bit gentle around here. So we're not trying to fill the seam with a whole bunch of superglue. It's just going to be a little bit bigger dot than we used on the puzzle joints. But, you know, quarter inch, half a centimeter, something like that. It's like spot welding. Yeah, we're just spot welding it together. And this is not what's going to hold the boat together in the long run. We want to fill this seam with epoxy. And so the more super glue we get in there, the less room for epoxy there is. So we don't fill it with the super glue. We're just trying to hold it together long enough that we can get the epoxy fiberglass in. After this is glued up, we're not going to strap it to the roof of the car and take it across the country. We'll keep it on the workbench, pull out all the wires, and then do the fillets on the inside seam. But this process, we're going to do all the seams full length. Check the bottom seam, line that up nicely. If you've got to push on it a little bit to line things up, and again, just a dot and a dot. And if you've got a seam that's lining up well and you can move along, you don't need to spritz every six inches. You can take and do that. So with the little bit you're using, it won't flow through to the other side of the hole. It might flow through a little bit. Little bit. Yeah. But we're actually going to sand this chine over a little bit. We're going to round it a bit. You know, it's like a sharp knife. If you hit something hard like a rock, it's going to dull it. We actually, the boat is stronger if we round that corner.
Okay, essentially, it's this process all up and down the whole length of the boat. And I will show you what we'll do in the ends at the stem and stern in the separate operations. You can just do a little bit at a time. You can't really go far down. You'll have a sense of how far you can go without it moving. So just a little dot is it that about right? That's probably twice as much as you need, but it's okay. So just, you know, and right in the seam. And so stick the tip in into the seam. Oh, get it right in. And, you know, two dots per stitch, two dots per stitch like that. Yeah, you see that one you put in long thing and but we want it in the seam because that's where it's going to do the most good right? Yeah. So if you need to hold it while you're spritzing because things are shifting a little bit, feel free to do so. Just don't glue yourself to the boat. So up here where, um, we talked about before where there's a little light showing, do you need to use a little more glue or do you use the same amount? The same amount should be fine. Okay. And so where there's no bevel, you have some different method for fixing it?
Yeah, yeah. We'll look at that in a bit. Okay. So if you glue this up and then afterwards you decide that your chine has an edge on it or um, is there a, is that a point of no return? No, we just sanded smooth. Okay. The fairness and smooth shape of the boat is sort of defined by how well these go together. So it's not, you know, not something you're going to notice a lot when you're doing this glue. Go ahead and stick the tip right in the groove and don't try and drip it down into it. Just inject a small amount directly into it. All right, so we're trying not to get the drips running down the plywood. We're trying to get the glue into that crack really. It's a matter of kind of flexing the wood in different positions to get it to line up. Yeah. I've got the activator on my fingers, so any little bit of glue that gets on my fingers instantly cures.
The ends up in here can be a little bit tricky. There's not a lot of room in there, and the seams don't have the S of GrooVe in there because the panels are running flat together. But we'd like to make these nice and smooth across that seam just like all the other ones. I want to get glue into that seam without it just dripping down the side. So I'm going to flex the seam a little bit to see the top edge of that bevel there. And then I'm going to apply glue (GL) to that top edge. Then go ahead and realign everything there and get in there with the Spritz. Just hold everything well aligned. You can press things together, tighten up that seam. If there was a gap in there, might be able to take care of it right now. Just hold it for a second for that glue to set up. We got a little bit of squeeze-out there, but I can spray from this side to get it fully cured.
Here we have a similar thing going on on this side, but it's a sort of shelf on the outside. But we should be able to get some glue onto the top of that and then line everything up. So we don't want it dripping down the side, little Spritz, and now get that lined up. Hold it until the glue sets up. I only glued my fingers in a little bit. We don't want to forget gluing the stem together. We're going to pull all these stitches out pretty soon, and if we haven't glued it, it's all going to go sproing. So you want to get glue down into that seam. We're not trying to saturate it with glue, but get some drips down in there. Try not to get it on the wires just because we got to pull the wires out, and it might have to drip in a little bit. And you get the drops to go right down in there, and we'll send a Mist activator down in there as well. Some of those wires may get glued in, but that'll be okay.
So what if I'm pushing as hard as I can and there still, um, the seam isn't even in, but I'm unable to move the wood together? Oh, wait a second, maybe I can. It's tight. Don't be concerned about using some force. Oh, you can, yeah, yeah. It's not, you're not going to explode the boat or, okay. I think that was my concern, yeah, that I was going to break the wood, okay. Up on the front here where the seam no longer shows a gap, do I stop? No, we want to glue that, okay. Just let it run into that area. So, you know, just, it'll deal with it, it'll flow in, and we'll be planing and sanding the outside to make it smooth on the outside, okay.
So we have now stitched it all together and put the initial glue in the seams, again the CA glue in the seams. We could go immediately now as soon as the glue is dry. We could clip all the wires and pull them right back out again. The next episode will be clipping out all the wires, putting what we call a fillet on the inside seams, and glassing it. At the end of the next day of work, we will have the interior of this all glassed and ready to work on the exterior. So what's your thoughts on the day, anything that uh struck you as interesting or unexpected? Um, I think the interesting thing to me was the technique for pulling on the wire was something that took a little finesse and took a little time to understand that you know, you want to twist the wire to make tension and that breaks the wire. Yeah, you just can't do it, you have to create the tension and then like you say, lock it. And that's what makes the seam come nice together. And, uh, yeah, but I mean overall, um, yeah, you know, at the end of this day, you have a beautiful shaped boat. Yeah, it's a little bit deceptive because you think, you know, wow, we're almost there, um, the boat's almost done, you know, there's a lot of work left to do. We've got to glass the inside, glass the outside, work on the deck, glass the inside, glass the outside of the deck, put them together, make hatches, you know, there's a bunch of stuff to go along, but this is a very gratifying part of the project because you go from a pile of flat pieces into a three-dimensional boat-shaped object in a couple of hours, and it is really pretty gratifying. Be prepared to be patient because there's a lot more work to do. So if you're enjoying this series, it's ongoing, hit subscribe so you can get the latest coming out, hit notifications so YouTube will presumably let you know when it comes out. I find they're not very good at that, but hit notifications anyways, it's supposed to do me good, um, and then, um, we'll see you next time and Happy Paddling.