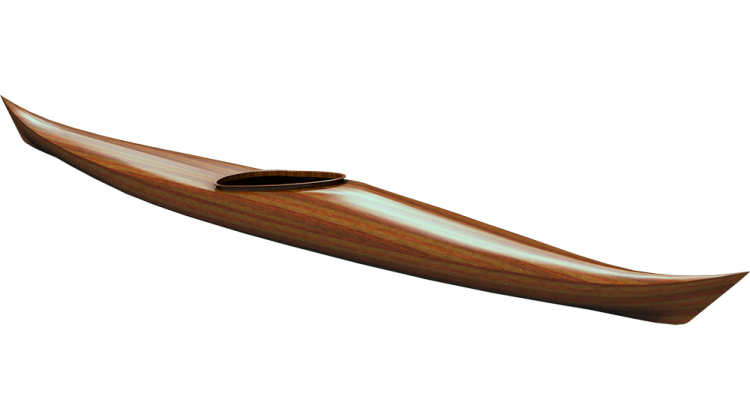
In this episode Bill and I continue work on the Petrel Play SG Stitch and glue sea kayak kit from Chesapeake Light Craft. Provided by Chesapeake Light Craft, this kit is my design. If you're interested, I also sell plans for this kit directly for those who want to build it from scratch.
In this third episode of our workday, Bill and I started by applying a fill coat on the inside of the hull. We then proceeded to do some deck stitching, followed by the assembly of the hatch and cockpit recesses. We finished off this episode by completing the stitching together of the deck, placing the cockpit and hatch recesses on the deck, and prepping the deck for filling.
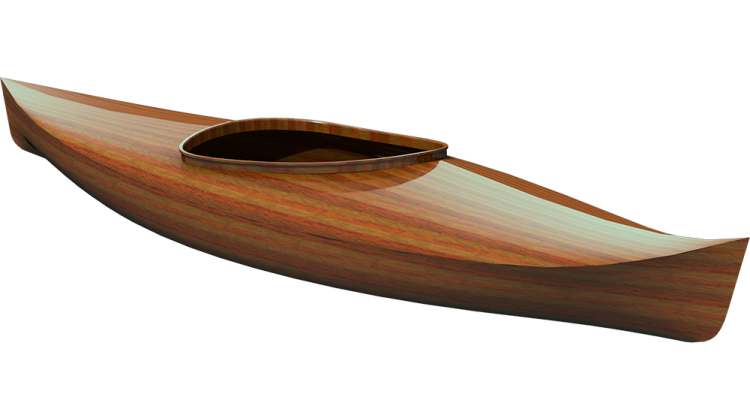
The focus of the last and current episodes has been on the front hatch recess. While this may seem like a hassle, the recessed hatch is crucial for achieving a reliable, watertight seal using rubber-style hatches. This design choice involves creating a flat area on the front deck to mount the hatch's ring, which is essential for keeping the hatch watertight. Additionally, the recess helps keep the hatch below the deck, preventing water from splashing into the air when paddling through rough waters.
This meticulous process is driven by the desire to create a high-performing and aesthetically pleasing kayak. Although it may be challenging, the recessed hatch is an integral part of this project.
Moving on to the assembly process, the cockpit recess and hatch recess are fitting in similar ways. After ensuring the cockpit area is wired in, we focused on getting the long seams and hatch assemblies in place.
The next steps involved fitting the back hatch and front hatch, requiring suitable beveling of the edges to ensure a proper fit. Once the beveling was done, it was time to wire in the cockpit area and the hatch recesses, ensuring a precise and secure fit.
In the end, while the process is detailed and involves a lot of intricacies, it's important to ensure that everything is wired in before applying the final adjustments.
Emphasizing the importance of attention to detail, we wrapped up this episode by accomplishing a lot, from applying a fill coat to putting together the deck and making adjustments along the way. The upcoming episode will focus on tweaking the alignment of the panels, spot welding, filling, and glassing.
Despite the challenges, this episode covered a lot of ground and set the stage for the next steps in the process.
Hey welcome back to The Guillemot Kayaks Workshop. I'm Nick Schade and Bill, and I are building the Petrel Play SG Stitch and glue sea kayak kit from Chesapeake Light Craft. Chesapeake Light Craft provided me with this kit, but it's my design. I also sell plans for this kit directly if you want to build it from scratch. That's a possibility as well.
This is the third episode from one day of work. Bill and I started this day putting a fill coat on the inside of the hull. Then we did a little bit of stitching up of the deck and then we went to putting together the hatch and cockpit recesses. In this episode, we finished stitching together the deck, putting the cockpit and hatch recesses in, on the deck, and getting the deck ready for filling.
The next episode after this, we will fill the deck and eventually glass it. The past three episodes have been one day worth of work. I'm just breaking it down into smaller segments to keep it a little bit more digestible, trying to break it up into parts that sort of make sense with each other.
You'll notice with the last episode and this episode, we spend a lot of time working on the dang front hatch recess. It's a process you may look at it and say why are we going through all this hassle to have a recessed hatch on the front deck of the kayak, and it's a legitimate question. It's not wholly necessary.
There's other ways we could go about this, but I want really dry hatches on this, so these rubber style hatches are really reliably dry. And as a consequence of using that kind of hatch, they have this ring that needs to be mounted on the deck. That ring needs to be mounted on a flat area. The front deck of a kayak is rarely flat, so we need to make a flat section, and that's what the recess does. I could make that flat section a little less drastic and maybe a little bit easier, but I also want to get the hatch down below the deck a little bit so if you're in a situation where water splashes across the deck, you don't have that hatch just jetting water up into the air.
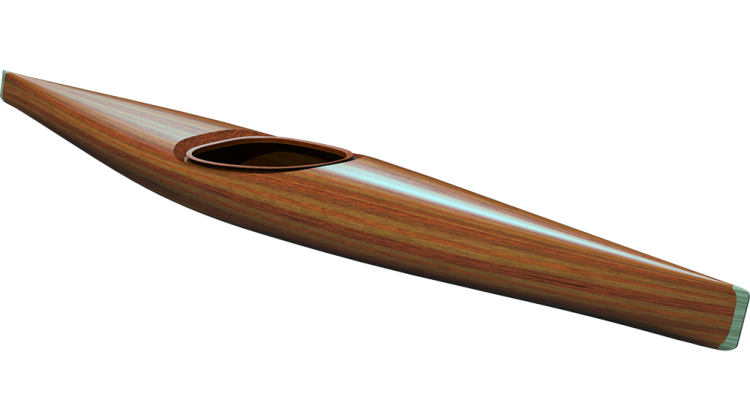
As I record this, I was actually out yesterday paddling my Petrel Play in a sort of short wavelength tide race where I was burying the bow a lot. There should be some video up here showing what that looks like. You'll see that the water just goes right across that front deck hatch without any disruption.
That's kind of why I'm doing it. I also think it kind of looks cool to have it down recess, that keeps the lines of the boat looking nice. You know, there's a little bit of pain now to put this thing together, but I'm trying to make a kayak with this project. I'm not trying to make it an easy project. I want a kayak that performs well, a kayak that looks good, and this recessed hatch is part of that process.
So with that said, let's get to it and get these recesses installed in the deck, and you'll see it's a bit of a process, but it all comes out in the end.
These assemblies are sort of fitting in in a similar manner to the way the cockpit recess is going. This one will go up here, and this one will go back here, and we've got a little tab with a little notch, and so that will go here, and they will take some fitting yet, but that's essentially where they're going to go.
You know, we've loosely sort of assembled this, but we haven't really gotten to the point of getting it dialed in. The cockpit area here, there's a lot going on in this area so I think this is where we'll start. We'll get the cockpit kind of wired in, and we have Stitch holes here that should line up with the Stitch holes on the cockpit, yep, and so we'll get both sides wired into the sides and then we'll do the front and back and get those wired into the cockpit. And then we can start doing these longer seams, and then when we get in with the back deck, we'll get both sides wired up and then work on getting the hatch dropped in here. We'll work up to the front hatch on both sides and then work on getting this hatch wired in before we continue down to the bow of the boat.
That makes sense going on, there's a whole lot going on here, yeah, where this back hatch, we've got an oval into which we're trying to fit; it's pretty straightforward. We just want to make sure that this is flat and in the shape it's going to be. We've got a bit of a bevel on the edge of these, but right now, this was cut at a 45 and this edge here is vertical, so we are going to want to make this edge here essentially perpendicular to the bottom here. Right now that bevel isn't quite enough to drop down in there, so we'll end up sanding that to make it fit into that oval, and likewise on the front hatch, we'll have to do more of that also.
Much the same we did on the inner circumference, and you know here it's, you know, this is not enough and we can do that hand-sanding or we can take it over to here and do it on power tools. This has a nubbin on it that fits into a notch here just to help you remember which is the front and back, likewise this, just like this, has that nubbin a knot, let's start wiring the cockpit area in, really doesn't matter if you do the stitches from the inside out or the outside in; we just want them stitched, okay. So, it's what's more comfortable for you, so you can see what you're doing if it's easier to do it from the inside out, but then you got to reach under here to do the twisting, or you can do it from the outside in where you can do the twisting here so experiment with whatever works for you, there's not a right and the wrong way, just we want it stitched down, so we want these Stitch holes straight across, and we don't need to make them perfect now, but think about having the smooth edge along here so things are lined up, again it doesn't need to be perfect right now, we're going to perfect it when we glue it in place, up near the front of the combing I think the Stitch hole got lost in the puzzle joint, so can make a new one.
We're not doing the front now, right? I think we're just about to the point where we can do the front and the back; this needs to be able to fit together tightly back here too, so don't get things too tight before you know you can get it all together, since this is going sproing all the time, I'm going to take and put one right here just to stop that, keep it under control a little bit, and again sometimes places like this it may be easier to run them up from below you can give it a try because it's so hard to twist them under here, finding the holes coming up from below it's the tricky part.
You know, we're using one of the Stitch holes for this going down to the form, I think we can probably take this out, this is the one that really matters since it's holding the curve down, so we can pop out this and then go between the two panels, okay now these are starting to not be, yeah, I think, no they're, they're fine, this is ending up right at the right place it is, okay, yeah, so that's how you check that is just where the, yeah and I'm seeing so this piece nests right along the side there into the notch there, this piece we've actually the last bit is broken off here we might find that place piece someplace and glue it back on, but chances are it's gone for good, it seems this process is rather forgiving that you can, yeah you can, I mean there are things that have to be pretty good but other parts of the project are so.
At the end of this panel here, the panel is too skinny to drill a hole through, so we can just take and wrap this wire just around the outside to hold it in place. I think one way this video will be very good is that learning what you have to worry a lot about and what you don't, yeah, yeah, and then that and what that is, you know, part of experience also is you start to figure out what really matters. And I guess I will clip out these, it's not super critical, they seem to be holding just fine, this is where the double Stitch hole is onto the form, and that's taking up one of the holes to go from panel to panel here.
We want to keep these side panels wired down to the form so we get that angle of the side panel correct, and I just cut it out by mistake because I was not paying attention, I can get this, we'll get it on camera, standing, if you're standing there you're blocking the camera, it's all about the camera.
Okay, so now we've got the back hatch to fit, we've got most of the long seams stitching up. The back hatch is going to go in like this and basically come up through here and the top edge here of the hatch should be flush with the deck, but as I said earlier this is beveled at an angle like this and so if I put a straight edge on that is s of angled out and this is vertical so we want to make this edge I actually instead of going for straight vertical I tend to angle it in a little bit, and I'm in favor in the mood for power tools right now, I could just run this on this surface like this and make it sort of vertical, but to get a little bit of a bevel angle there I'm going to tilt the table down slightly and do it like that so I don't want to disrupt this top edge here, I want to keep that as is to the best of our ability, we might need to disrupt it later but we'll start by just bringing this in till I see the sander just kissing that top edge, working on this devil right here, I'm trying to leave the last ply, basically untouched, then widening that devil all right, see how that works.
So to bring it in from below and that seems to fit first try a little bit of interference up here at that bevel, so it's just file back the corners the no a little bit so I'm just feeling the underside here to see if it's a nice smooth edge and see, seems like we're able to get that nice and smooth, something wire in, and if you run out of Stitch holes feel free to make one, make some more, do you know, there was probably one meant to be one here to here but wherever it seems to make sense to have one to help you do what you need to get done and no, should there be another one here, that's okay we'll, we'll hold it when we glue it okay. All right, so now it's the same drill on the front hatch so this piece is going to fit down in here and once again this bevel is not correct we need to give it an appropriate bevel on there so we could absolutely do this with hand sanding take a sanding block and be that Ed so we're creating a bevel right along this edge here like that, but we have the power tools might as well use them.
So, you see I'm making a pretty wide bevel there that's just trying to make that edge vertic so so it drops down into the hole so I've taken it to a bit of a feather edge there this Edge is pretty fine, it's going to be down in here, and we're going to do a fillet in here and so that area is all going to be filled with Schmutz so this it'll be reinforced yeah, yeah so this is a little tricky, because the forms here and chances are good that the sides need to be squeezed in a little bit in order to fit between the, the sides of the deck with the form there it's it can be easier to come in from the bottom but the form's in the way so if we really struggle with this, we may find out we want to cut the form off temporarily okay, just so we can get thing situated the form's going to have to go back in to make sure everything's the right width, but for now put it in from below, and again we've got a nubbin here that mates with a notch there so driving this up in between, we don't want to break these skinny edges of the deck panels.
Mhm it's going in a little tight so I think we'll want to sand that edge a little bit more just to give it a little bit more leeway. I want to be careful, this is the part that cracked a little bit, and so it's a little bit unfair right there it's got a lot of flex, so it should far back out again, but we don't want to just bugger up that edge too much where's that hand-sanding block is that over there, so we can sort of work that area, it's just a matter of feel when you're putting this in you're feeling how much tension there is there and then, yeah, you know, I sort of being careful that these points coming around the hatch area, I don't want to force those out and break them off, so I'm trying to make this come up into there, you know it's going to be under some tension, because again I do think we need to squeeze in these sides a bit so I'm getting that Notch lined up in front M and then pushing down on the sides here and I want to draw this in tight, yeah, I think that will go, now so it may be best to just start to stitch this in a little bit get it tight up there and then work our way around so I'm going to start right there I want to get that one tight, slack out, get that in there tight, the tug on the wires, it's kind of like a one-person thing, well, yeah you know if we're both struggling in the same area, it's yeah I often find doing it this way, where I go down one side come up the other come up the other that way I only need to figure out where the, yeah and I'm seeing so this piece nests right along the side there into the notch there, this piece we've actually the last bit is broken off here we might find that place piece someplace and glue it back on, but chances are it's gone for good, it seems this process is rather forgiving that you can, yeah you can, I mean there are things that have to be pretty good but other parts of the project are so.
At the end of this panel here, the panel is too skinny to drill a hole through, so we can just take and wrap this wire just around the outside to hold it in place. I think one way this video will be very good is that learning what you have to worry a lot about and what you don't, yeah, yeah, yeah, and then that and what that is, you know, part of experience also is you start to figure out what really matters, and I guess I will clip out these, it's not super critical, they seem to be holding just fine, this is where the double Stitch hole is onto the form, and that's taking up one of the holes to go from panel to panel here.
We want to keep these side panels wired down to the form so we get that angle of the side panel correct, and I just cut it out by mistake because I was not paying attention, I can get this, we'll get it on camera, standing, if you're standing there you're blocking the camera, it's all about the camera.
Okay, so now we've got the back hatch to fit, we've got most of the long seams stitching up. The back hatch is going to go in like this and basically come up through here, and the top edge here of the hatch should be flush with the deck, but as I said earlier this is beveled at an angle like this and so if I put a straight edge on that is s of angled out and this is vertical so we want to make this edge I actually instead of going for straight vertical I tend to angle it in a little bit, and I'm in favor in the mood for power tools right now, I could just run this on this surface like this and make it sort of vertical, but to get a little bit of a bevel angle there I'm going to tilt the table down slightly and do it like that so I don't want to disrupt this top edge here, I want to keep that as is to the best of our ability, we might need to disrupt it later but we'll start by just bringing this in till I see the sander just kissing that top edge, working on this devil right here, I'm trying to leave the last ply, basically untouched, then widening that devil all right, see how that works.
So to bring it in from below and that seems to fit first try a little bit of interference up here at that bevel, so it's just file back the corners the No a little bit so I'm just feeling the underside here to see if it's a nice smooth edge and see seems like we're able to get that nice and smooth something wire in and if you run out of Stitch holes feel free to make one make some more do you know there was probably one meant to be one here to here but wherever it seems to make sense to have one to help you do what you need to get done and no should there be another one here that's okay we'll we'll hold it when we glue it okay all right so now it's the same drill on the front hatch so this piece is going to fit down in here and once again this bevel is not correct we need to give it an appropriate bevel on there so we could absolutely do this with hand sanding take a sanding block and be that Ed so we're creating a bevel right along this edge here like that but we have the power tools might as well use them.
So you see I'm making a pretty wide bevel there that's just trying to make that edge vertic so so it drops down into the hole so I've taken it to a bit of a feather edge there this Edge is pretty fine it's going to be down in here and we're going to do a fillet in here and so that that area is all going to be filled with Schmutz so this it'll be reinforced yeah yeah so this is a little tricky because the forms here and chances are good that the sides need to be squeezed in a little bit in order to fit between the sides of the deck with the form there it's it can be easier to come in from the bottom but the form's in the way so if we really struggle with this we may find out we want to cut the form off temporarily okay just so we can get thing situated the form's going to have to go back in to make sure everything's the right width but for now put it in from below and again we've got a nubbin here that mates with a notch there so driving this up in between we don't want to break these skinny edges of the deck panels mhm it's going in a little tight so I think we'll want to sand that edge a little bit more just to give it a little bit more leeway I want to be careful this is the part that cracked a little bit and so it's a little bit unfair right there. It's got a lot of flex so it should far back out again but we don't want to just bugger up that edge too much. Where's that hand sanding block? Is that over there so we can sort of work that area.
It's just a matter of feel when you're putting this in. You're feeling how much tension there is there and then yeah you know, sort of being careful that these points coming around the hatch area. I don't want to force those out and break them off so I'm trying to make this come up into there. You know it's going to it's going to be under some tension because again I do think we need to squeeze in these sides a bit so I'm getting that Notch lined up in front M and then pushing down on the sides here and I want to draw this in tight yeah I think that will go now.
So it may be best to just start to stitch this in a little bit, get it tight up there and then work our way around so I'm going to start right there. I want to get that one tight slack out get that in there tight the tug on the wires. It's kind of like a one person thing. Well yeah you know if we're both struggling in the same area it's yeah. I often find doing it this way where I go down one side come up the other come up the other. That way I only need to figure out where the hole is once.
Beneath we could use a stitch hole right here I'd say so now let's see if we can put this form back in. So again these stitches are going from the inside out and we'll leave them in while we glass. Now all we've got left to do is basically around here so at the front of the hatch and it will probably require pulling this panel in this way a little bit. The Stitch holes are a little bit out of alignment. You see there's a big gap there so we're just going to draw this panel in tight to the front of that hatch and this all the way down that edge.
Alright so let's wire that in I'm going the wrong way huh now whatever works for you does doesn't matter it doesn't really matter okay all it matters is it gets wired up eventually and it might take a couple turns to get this nice and tight I can't what to do with me yeah just trying to get the pressure you need on yeah over here, yeah there's a lot going on in this area yeah I guess I'm about cooked you know all we have left to do is this bit let's go ahead and do that.
I'm going to put another hole right next to the end form here to wire these two panels together. Okay let's call that a day all right I think we did a lot yep we did a lot so. Recap we accomplished a lot today we started out fill coat on the hall then we started assembling the deck and we learned how to fix some mistakes which is always cool and so at this point the deck is all wired together we haven't done the final adjustment the next episode will be tweaking the alignment of the panels spot welding it filling it and glassing it so that we we've done the process on the hall this will be the same process on the deck you know we'll see how it goes but I think this was this episode covered a lot of ground.
I'm going to have a hard time editing all of this any thoughts you had from what we did today I like you said I I think we covered a lot of ground we started off you know put putting the epoxy inside of the bottom of the hle and then got this all put together and the small round hatch took quite a long while to yeah no the the round hatch is the killer assembly on this process the the oval hatch was pretty easy and putting it in the back deck was dead dead easy but yeah there's a lot going on in this front PCH area a lot of stress in the plywood but part of the reason I have it with so much stress is I wanted to get the hatch sort of down below the deck level so when water washes across the deck it doesn't hit that hatch and hit you in the face yeah so it makes the the the hatch nice and flush you we just got to deal with some pain right now yeah it gives a nice profile to boat that you know it's a beautiful shape now that that that we can see taking shape yeah it'll it'll be fun to flip it over and see the stain yeah so if you're interested in seeing more of this hit notifications subscribe all that fun stuff hit like and until the next episode happy paddling.